If you’ve received an error message on your Husqvarna Autmower saying you have an issue with your wheel motor. Or you’re robotic lawn mower is experiencing wheel motor overload and driving issues, and you need to pop in there, take a look, and change out the wheel motor.
In this blog and video, we are going to break down the step-by-step process of exactly how to change the wheel motor on your Husqvarna Automower 430X or 450X.
But first…
Are the Husqvarna 430X and 450X the Same? How Are They Different?
So glad you asked.
The bodies on the 430X and 450X are exactly the same. For example, the 430X has room for a second battery, just like the 450X.
A common question follows: “Can I put a second battery in my 430X?”
Nope. You cannot put a second battery in your 430X. You’d also need a different charger for the base station as well. So one battery for the 430X, two for the 450X.
Read: New Automower Intelligent Mapping Technology
What Tools You’ll Need to Change Out the Wheel Motor
Head to the garage or the shed and grab yourself the following:
- an adjustable wrench
- A razor blade
- some clippers, and finally,
- A screw gun with a T25 bit.
If you want to use a different wrench on this, you can use a 24 millimeter. We have one big bolt in here.
Read: How to repair a perimeter wire break on your robotic mower in 4 steps.
Step 1: Pop the Body Shell Off
You got four little pegs holding the body on. So the first thing you want to do is pop that up. You have four corners to pop up, and there are a couple cords holding it on in front.
Go ahead and prop the chassis on the shell so the chords stay attached without being pulled too far and putting pressure on them.
Step 2: Remove the Tire
The way we did it was grab a razer blade and use it to pop the hubcap off. (Sometimes you can do this with your hands, but we find it’s easier to do this with a thin, straight edge like a razor blade.
Take that same razer blade and use it to break the warranty seal right along the edge of where the top and bottom of the chassis meet.
Next step: grab your wrench and take the bolt off of the center of the tire, where the hubcap was. Remove the bolt and washer.
Don’t make this common mistake: When people put the wheel back on, they still want it to spin freely, so they don’t tighten the bolt enough. Tighten it as much as you can. There’s no such thing as over tightening this. You want it nice and tight against that wheel motor. (Also, when you’re screwing the tire back on when you’re done, you might hear a little “pop”. Don’t worry about this.)
Step 3: Remove the Chassis
So now we take the body off. We have 14 screws, seven on each side, right around the outside.
You’ll see – along the corner edges of the machine – 4 screws holding together what looks like little joysticks. You can leave these in.

Follow along the edges of the chassis with your screwdriver and unscrew all 14 screws around the edges.
When you’re done unscrewing, gently lift up the chassis, and in the center back of the machine, you’ll find a cord holding the top to the bottom. Simply lift it up with your fingers and release the top of the chassis from the bottom.
Step 4: Clean the Engine Bay & Replace old gaskets
Usually when you take the chassis off, you’ll see a bunch of dirt and grime from the Automower doin’ it’s thing. You’ll want to clean this with an air compressor, a rag, or brush. We do not suggest using water.
Replace the rubber gaskets too if the mower is a bit on the older side (for example, if its more than 2 years old.)
Read: How to clean your robotic lawn mower
Step 5: Unplug and Unscrew the Wheel
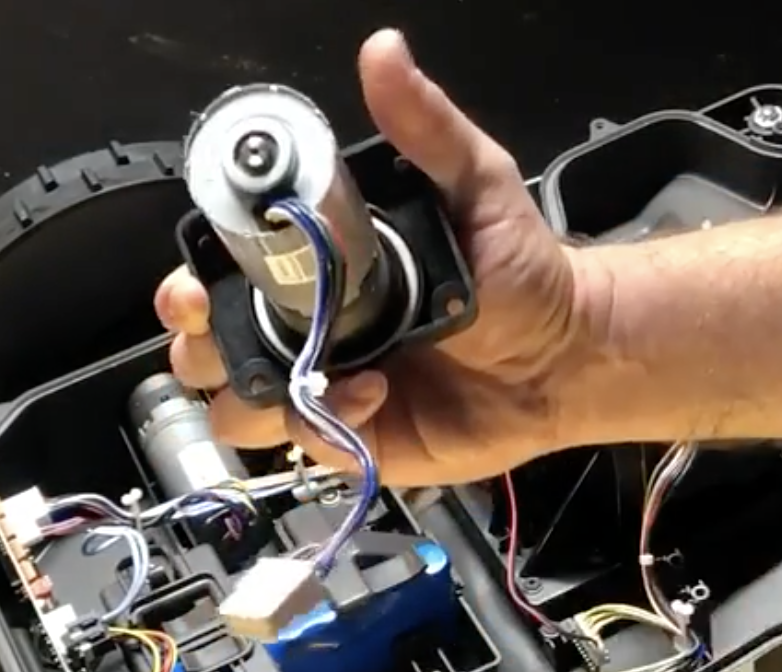
Locate the wheel motor. Here’s a hint:

^^ It’s this. This is the wheel motor right here.
Notice that bundle of cords near the wheel motor? Grab your clippers and clip off the little black zip tie holding all the cords together. You can twist off the white brackets holding the cords together, and this allows those cords to pop out and move freely. This allows you to access the wheel motor chord, and release it from the chassis. (It looks like a white phone jack attached to the back of the chassis. Gently release this.)
Once your cord is disconnected from the chassis, you are free to pull the wheel motor.
Unscrew the four screws on the outside of the chassis where the wheel motor connects. Next, simply slide out the wheel motor.
When you put in the new wheel motor, look for this little white O-ring. Make sure that that’s on there. (We’ve seen some ship without the O-ring, so just double check.)

But now the new one’s ready to go in.
Make sure also, your torque on your screw gun is not too tight, if you’re using a screw gun. Again that’s a torques 25 bit. As soon as you go more than just one resisting turn on the screw gun, you’re risking stripping those plastic spots for the screws.
Finally, put the shell back on
Common mistake is to not put the tape-like cord back in that connects the top of the chassis to the bottom. It slides right into the back bracket and clips in automatically.
While rescrewing on the chassis, it’s a good idea to skip screws so you are able to seat the body on top nice and tight.
Put the hubcap back on, put the shell back on (make sure it’s nice and centered) and then push the four corners straight down.
And done!
Have any more questions about maintaining your Husqvarna Automower?
Here at Autmow Robotic Mowing, we’ve spent the last few years researching and using robotic lawncare products – from robotic lawn mowers to field painters and more. Reach out and ask us any questions you may have.
For more information on robotic lawn care, check out our YouTube channel!