

How to Clean Lawn Mower Carburetor in 10 Easy Steps
To clean your lawn mower carburetor in 10 easy steps, start by ensuring safety. Disconnect the spark plug and put on your goggles to protect your eyes. This is super important before you begin any work on your mower.
Next, remove the carburetor using some basic tools. Take apart key components like the float bowl and jets, then soak them in carburetor cleaner. This helps break down any gunk or buildup inside.
After soaking, scrub all the parts and clear out every passage with a wire or compressed air. Make sure everything is spotless for the best performance.
Finally, carefully reassemble the carburetor and reinstall it. Reconnect all fuel lines and linkages, then fire up your mower’s engine to test it out. Follow these simple steps, and you’ll have your mower running smoothly again in no time!
Safety Precautions Before Cleaning
Before you start cleaning your lawn mower carburetor, make sure you disconnect the spark plug wire to prevent the engine from accidentally starting. This simple step is essential for your safety.
Next, always wear safety goggles to protect your eyes from chemical splashes and pressurized sprays during cleaning. It’s best to work in a well-ventilated area to avoid inhaling harmful fumes from carburetor cleaner and gasoline vapors.
Also, keep flammable materials away from your workspace—no sparks, open flames, or anything that could ignite a fire. Taking these precautions seriously guarantees you stay safe while cleaning your carburetor efficiently and effectively.
Don’t skip these steps; safety always comes first. It’s better to be cautious than sorry!
Tools and Materials Needed
Once you’ve taken all safety measures, gather the right tools and materials to clean your lawn mower carburetor effectively. You’ll need basic tools like screwdrivers and wrenches to carefully disassemble the carburetor.
A wire brush comes in handy for scrubbing off stubborn deposits. The most vital item is a good carburetor cleaner spray, such as CRC Clean-R-Carb™, which dissolves varnish and buildup efficiently.
Don’t forget safety gear—wear goggles and nitrile gloves to protect against chemical splashes. Additionally, compressed air is essential to blow out fuel passages and jets after cleaning.
Keep a clean rag or soft cloth nearby to wipe parts and remove excess cleaner during reassembly. Having these tools and materials ready will make your cleaning process smooth and effective.
Preparing the Lawn Mower for Cleaning
Since safety is essential, start by turning off your lawn mower, disconnecting the spark plug wire, and making sure the engine has cooled down completely.
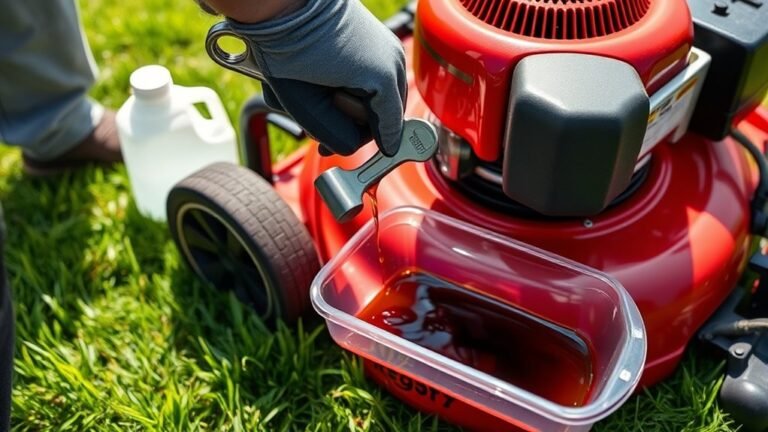
Next, drain the fuel tank or run the mower until it’s empty to prevent spills during disassembly. Remove the air filter cover and take out the air filter to access the carburetor and avoid letting debris inside.
Carefully detach the fuel line and drain any remaining fuel from the carburetor to prevent leaks. These steps set the stage for a smooth disassembly process, ensuring you can clean the carburetor effectively without risking damage or hazards.
Preparing your mower properly will make the entire cleaning process safer and more efficient. It’s definitely worth taking the time to do this right!
Removing the Carburetor From the Lawn Mower
After you’ve prepped your mower by disconnecting the spark plug wire, draining the fuel, and removing the air filter, you’re ready to take off the carburetor. Start by unscrewing the bolts or screws that secure the carburetor to the engine.
Carefully remove these fasteners to avoid damage. Next, gently detach the throttle and choke linkages, noting their positions for correct reassembly later. Take your time during this disassembly step to prevent bending or breaking any parts.
Once free, you can fully remove the carburetor from the mower. With the carburetor off, you’re all set to clean it thoroughly. Proper removal ensures an easier, safer cleaning process and helps maintain your mower’s performance.
Disassembling the Carburetor Components
Before you start disassembling the carburetor components, make sure you’ve removed the air filter and cover to gain full access. Next, disconnect the fuel line and linkage, then loosen the mounting bolts to remove the carburetor.
Carefully disassemble the float bowl by loosening its screws, then remove the jets and gaskets, noting their exact positions for reassembly. Handle all components gently to avoid damaging delicate parts like the float and needle valve.
Use a small brush or compressed air to clear debris from each part before moving on. Taking photos or notes during disassembly helps ensure you reassemble everything correctly.
This careful approach will make cleaning and maintenance easier, while preserving the carburetor’s proper function.
Soaking and Cleaning Carburetor Parts
You’ll want to soak the carburetor parts in a suitable cleaner using a plastic or glass container to protect them. Let them sit for at least 30 minutes to loosen stubborn deposits.
After that, scrub gently with a soft brush. Then, rinse thoroughly with clean water or compressed air to remove any leftover debris. Easy, right?
Soaking Techniques
When you soak carburetor parts in a cleaning solution, you loosen varnish, gum, and carbon deposits that have built up over time. Before soaking, make sure to remove all rubber gaskets and seals to avoid damage.
Use a dedicated carburetor cleaner dip or mix equal parts carburetor cleaner and water. Just be sure all metal parts are fully submerged.
Soak the parts for 30 minutes to several hours, depending on how bad the buildup is. It’s a good idea to check them now and then to see if they’re clean enough.
Once soaking is complete, gently scrub the parts with a wire or soft-bristled brush to remove any loosened deposits. This soaking technique guarantees thorough cleaning, helping your lawn mower carburetor work better and last longer.
Cleaning Tools and Tips
Although cleaning a carburetor can seem intimidating, having the right tools and techniques makes the job much easier and more effective. Start by using a dedicated carburetor cleaner spray or soak solution to break down varnish and debris on metal parts.
Carefully disassemble the carburetor, removing the float, jets, and gaskets for a thorough clean. Soak these metal components in the cleaner for 15-30 minutes to dissolve stubborn buildup.
After soaking, scrub jets and passages gently with a soft wire or a specialized cleaning kit to clear blockages. Finally, rinse all parts with clean water or compressed air to remove any remaining cleaner before you reassemble.
Following these steps ensures you clean carburetor parts efficiently and keep your lawn mower running smoothly.
Clearing Jets and Passages Thoroughly
Since clogged jets and passages can severely impact your mower’s performance, you need to clear them thoroughly using a small wire or fine needle to dislodge debris without causing damage. Carefully insert the wire into each jet and passage, gently removing any buildup.
Next, spray carburetor cleaner directly into these tiny openings to dissolve varnish and sticky deposits causing blockages. After applying the cleaner, blow compressed air through the jets and passages to flush out all loosened debris and cleaner residues.
This step is vital to ensure nothing remains that could restrict fuel flow. Regularly inspecting and cleaning these components helps keep your carburetor functioning properly and prevents engine problems.
Taking the time to clear jets and passages thoroughly will improve your lawn mower’s reliability and performance. It’s definitely worth the effort!
Reassembling the Carburetor
When reassembling the carburetor, make sure you align all parts like the float, jets, and gaskets correctly to guarantee smooth operation. Tighten all bolts and screws to the manufacturer’s specs to avoid leaks or air problems.
Finally, reconnect the linkages and hoses securely before moving on. It’s important to double-check everything so you don’t run into issues later. Taking your time here really pays off!
Aligning Components Correctly
Before you start reassembling the carburetor, make sure every component lines up correctly to prevent leaks and guarantee smooth operation. Start by matching each gasket and jet to its original position—using your reference photos or notes helps.
When placing the carburetor back onto the engine, carefully insert and seat the throttle and choke linkages into their slots without forcing them. Take time to ensure all components are aligned perfectly, especially the float and needle valve, which are vital for proper fuel flow.
Aligning components correctly avoids fuel leaks and performance issues. By double-checking each part’s position before tightening, you’ll set a solid foundation for the carburetor to run smoothly once fully reassembled.
Securing Bolts and Gaskets
Although aligning the carburetor components correctly sets the stage, securing the bolts and gaskets properly is vital to prevent leaks and guarantee reliable performance.
First, align the gasket perfectly with the carburetor mounting surface. Then, tighten the bolts evenly in a crisscross pattern using a torque wrench to the manufacturer’s specified torque. This ensures a proper seal without warping or damaging parts.
| Step | Action |
|---|---|
| Gasket Alignment | Position gasket on carburetor |
| Bolt Tightening | Use torque wrench evenly |
| Seal Verification | Check gasket for damage before |
Double-check the gasket is undamaged and seated correctly to maintain an airtight seal and ideal carburetor function. It really makes a difference in keeping everything running smoothly.
Reconnecting Linkages and Hoses
Since proper connection of linkages and hoses is essential for your mower’s performance, you’ll want to carefully reattach each control rod and fuel hose exactly as they were. This ensures everything moves smoothly and seals tightly.
Begin by reconnecting all linkages and control rods to their original positions. Test for free movement before you secure them.
Next, reattach hoses firmly and check the clamps to prevent any leaks. Don’t forget to reinstall the air filter housing and cover, tightening the screws to avoid air leaks.
Once everything is back in place, double-check the throttle and choke linkages to make sure they operate properly. Start your mower and watch how it responds, making any needed adjustments to the linkages for smooth control.
- Reconnect linkages ensuring no binding or stiffness
- Secure hoses tightly to prevent fuel leaks
- Verify air filter housing is sealed properly
- Adjust throttle and choke linkages for optimal response
Reinstalling the Carburetor on the Lawn Mower
When you’re ready to reinstall the carburetor, make sure all parts are completely dry and clean. This helps avoid leaks or performance problems.
Carefully align the carburetor with the mounting flange and tighten the bolts evenly. You want to prevent any warping or damage.
Reconnect all linkages, including the throttle and choke, exactly as they were before removal. This ensures proper operation.
Next, reinstall the air filter housing securely. This keeps dirt and debris out of the carburetor after your cleaning.
Finally, reconnect the fuel line tightly, refill the fuel tank, and attach the spark plug wire. Taking these careful steps when you reinstall the carburetor really helps maintain your mower’s performance and reliability after cleaning.
Testing the Engine After Cleaning
Now that you’ve reinstalled the carburetor, start the engine and let it warm up for a few minutes. Pay close attention to how it idles—smooth running means the cleaning worked.
If you notice roughness or stalling, you may need to inspect or clean the carburetor again. Sometimes it takes a little extra tweaking to get things running just right.
Starting the Engine
Before you start the engine, make sure you’ve reconnected all components, including the air filter and spark plug wire. Proper reconnection guarantees your lawn mower is ready for starting without any issues.
When you turn the ignition key or pull the starter cord, listen carefully for smooth firing and steady RPMs. It’s a good way to know if everything is working as it should.
Keep these tips in mind as you start the engine:
- Confirm the air filter is securely in place to prevent debris intake.
- Ensure the spark plug wire is firmly connected for reliable ignition.
Also, observe if the engine idles evenly without sputtering. Increase throttle gradually to check for smooth acceleration.
If the engine hesitates or stalls, it might mean the carburetor needs a bit more cleaning or some adjustments before you use it regularly. Don’t worry—it’s pretty common and easy to fix.
Observing Engine Performance
After guaranteeing the engine starts smoothly and the throttle responds well, pay close attention to how it performs during operation. Let the engine warm up briefly, then observe if it idles smoothly without stalling or vibrations, which signals proper carburetor cleaning.
Gradually increase the throttle and check for responsive acceleration and steady engine speed. Listen carefully for any unusual noises or hesitations that might indicate incomplete cleaning or blockages in the fuel system.
Also, make sure the air filter is clean, as a clogged filter can affect engine performance. Confirm the mower runs steadily and efficiently without sputtering or rough running to verify the cleaning was successful.
Monitoring these aspects ensures your lawn mower operates at its best after maintenance. Just take your time and keep an eye on how everything sounds and feels.
Conclusion
Cleaning your lawn mower carburetor regularly can boost engine efficiency by up to 30%, saving you time and fuel. By following these simple steps, you’ll keep your mower running smoothly and avoid costly repairs.
Remember, a well-maintained carburetor means a healthier engine and a better cut every time. So grab your tools, stay safe, and give your mower the care it deserves—it’s easier than you think!
Taking care of your carburetor not only improves performance but also extends the life of your lawn mower. Plus, regular cleaning helps prevent issues like rough idling and engine stalling.
With just a little effort, your mower will run efficiently, cutting your grass evenly and reducing fuel consumption. So, don’t wait—start cleaning your lawn mower carburetor today for a smoother, hassle-free mowing experience!